

Hello, today I will talk about automated API testing but first, we need to understand some concepts.
As we know, UI is the part that users see when they open an app or visit a website but there are lots of things going on behind the scenes. Most people think that testing is only about checking UI but these tests are the last stage of the testing process.
Always follow test pyramid when performing tests 🙂

So, what is an API ?
From wikipedia it is written like,
In computing, an application programming interface (API) is an interface that defines interactions between multiple software applications or mixed hardware-software intermediaries.
To understand this, let’s think you are using a mobile market application. When you order a product, the application connects to the Internet and sends your user, address, cart, and payment information (of course, there are more :)) to a server. Then, the server retrieves this data, performs the necessary operations, and sends it back to the application. The application then interprets that data and presents you in a readable way. (nicely-created order list) All of this happens via API.

Why do APIs need to be tested and automated?
Since no one wants to see a perfect UI with the 500 errors popping up everywhere, it is very important to test services beforehand. (Again, follow the test pyramid, please.)
There might be lots of bugs hiding in APIs and we need to find them fast before they are clustered. Although we can check service calls manually, it is really time-consuming since it is not like the UI. You can miss so many things when you dive into complicated structures and request/response flows. So automation is always here to reduce test effort and increase coverage for us.
In this article, you will see how to test an API step by step automatically. Let’s start 🙂
You can find the complete project on Github.
What will be used in this project?
We will use JavaScript for our testing project and all the libraries that are used in this project are listed below. I will not describe them one by one but you can click them to navigate their GitHub for detailed information.
How to create our environment?
First of all, we need node and npm installed in our machine. I also linked them, it is very simple to install. After installing, we can check it with the following commands on the terminal.
node -v
npm -v
After the node is installed, we are ready to create our environment. So first let’s create a folder for our project and navigate into it. Open the terminal again and run these commands.
mkdir “folder name” && cd “folder name”
We have a folder to work on it right now, so let’s initialize npm here for creating our package.json file. Type this command on the terminal and you should see some prompts just press “Enter” for now.
npm init
Now, it is time to get our frameworks in-game. So again, let’s type this command for installing dependencies.
npm install mocha chai supertest— save-dev
After that, let’s open our project and make sure that everything is installed.

As you see, our libraries were created in the project and are ready to help us. Before going into the code section, we need a small change which is shown below in our package.json file.
“scripts”: { “test”: “mocha” }Now, that this part is completed, we can focus on our project completely. 🙂
How to create our tests?
We will use dummy rest API’s provided for us from here.
Let’s create a folder named “test” and “comments.js” file inside it in our project.
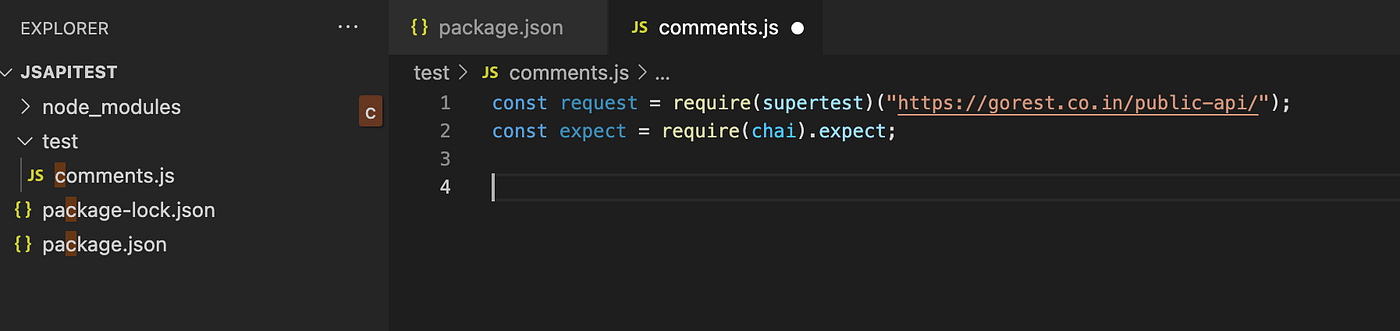
After that, we need to import our libraries using the following code lines.
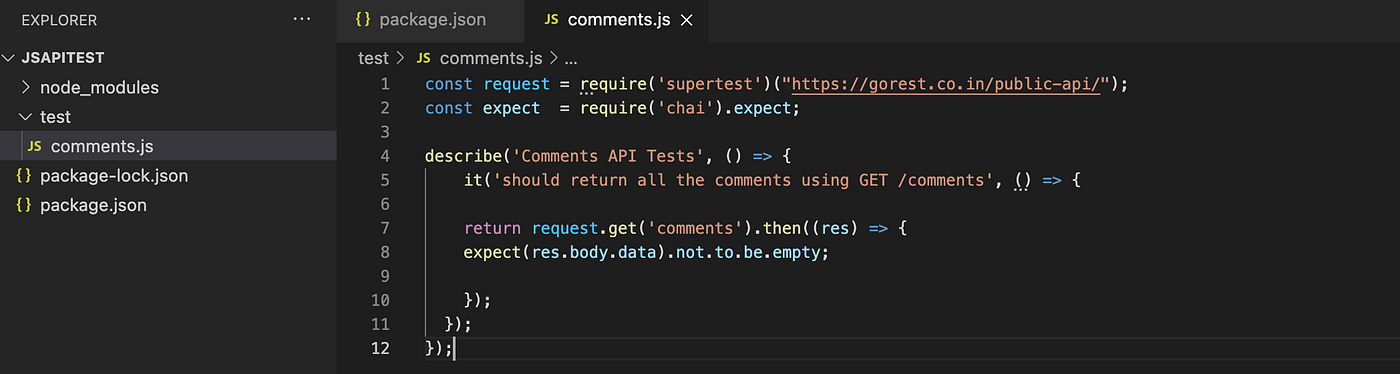
Finally, thanks to mocha and chai we can create our tests in a readable format. As it is easily can be understood from the image below, we are just checking if we are getting a response or not.
We can run the test from the terminal using the below command. After running it, we will see the output.
npm test
Let’s add some new assertions and one more test and run it.

After doing some GET stuff above, let’s add POST and DELETE examples too. I will create another test file for another endpoint which is “Users” in our case. So let’s add the “users.js” file in our “test” folder and add our libraries.

Again, we will create our test group in the “describe” block using mocha and add two tests for POST and DELETE methods.
In order to do POST and DELETE operations, we need to authenticate first. An authentication token is also provided by the API’s provider, so we also get that and put it in our project as a constant value. (for now :))
Different from the GET, we are sending data so we have created a data and “.send” function below. After that, we checked if the data is created as we want with expected conditions.
Please see that I added the “.only” tag for my test because I didn’t want the previous tests, which are inside “comment.js”, to run.

Finally, we also added our DELETE case with some static IDs and removed the data that we added previously.
As you see in the output, I tagged the previous 3 cases with “.skip” so you are seeing them as blue and in pending status.

To sum up, we have added 4 test cases for our APIs, we have used GET, POST, and DELETE methods inside our project. As you see, it is very easy to test with provided libraries. We are just changing the methods like “.get”, “.send”, and “.delete”.
In the next article, I want to show some more advanced stuff like parameterizing our test data and constant values and adding some more advanced expected statements. For now, we are done 🙂
Thank you for your time.